
Table of Contents
Introduction
Ever recorded a video for class and then wondered, “How do I actually submit this in Canvas?”
If you’re learning how to post Kaltura video for Canvas assignment, the process can feel confusing at first. Kaltura and Canvas often work together, but each school may configure them differently. You might see different buttons, menus, or submission options.
This guide breaks everything down into simple steps for beginners. You’ll learn how to upload a video to Kaltura, add it to your Canvas assignment, and complete the final submission.
You’ll also learn how to check whether your video was submitted successfully. This matters because uploading a video to Kaltura alone may not submit your assignment.
By the end, you’ll know exactly what to click and what to check before the deadline. Whether you recorded your video with Kaltura or already have a video file, this guide will help you submit it confidently.
What Is Kaltura in Canvas?
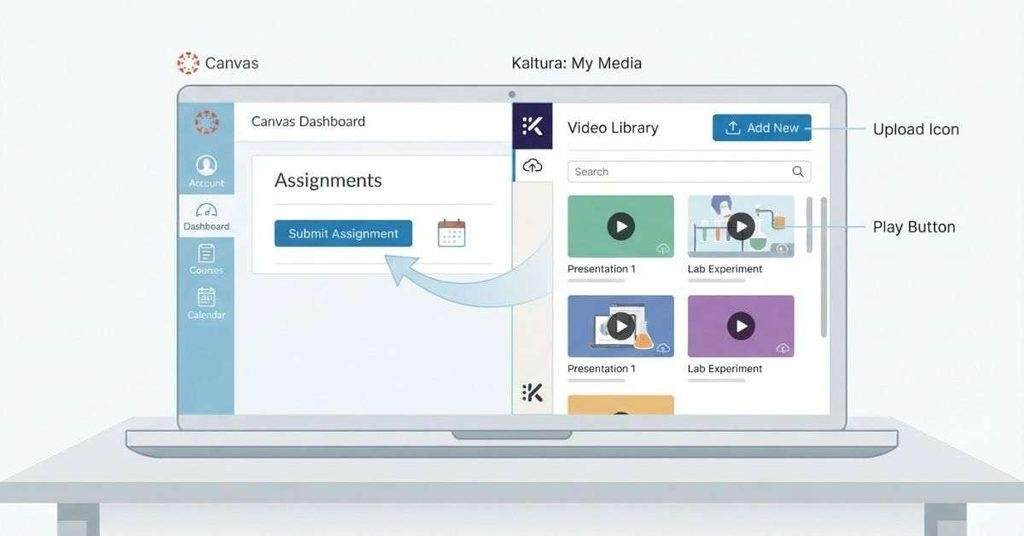
Kaltura is a video platform that many colleges and universities connect with Canvas. It lets students record, upload, store, and share videos for coursework.
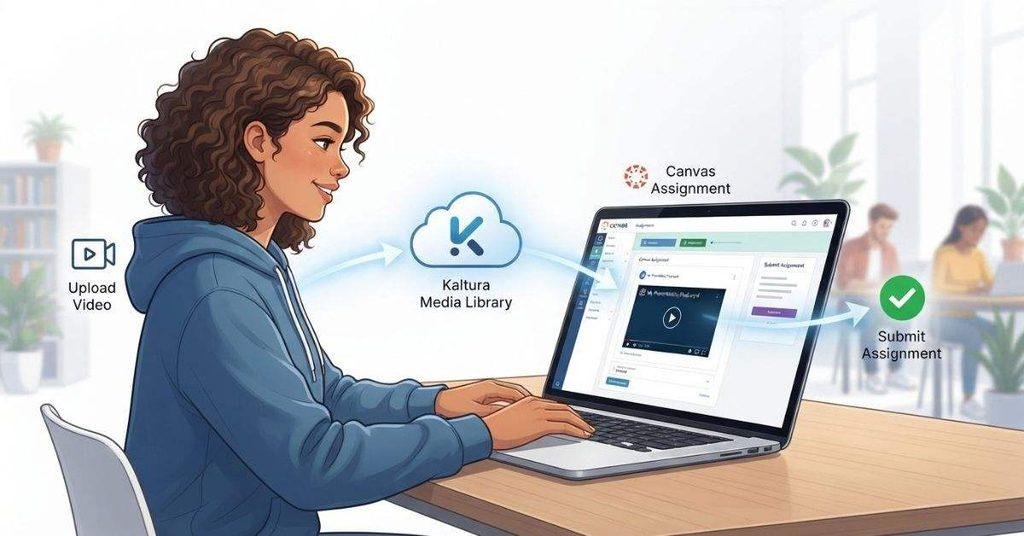
The basic process is simple: your video → Kaltura → Canvas assignment. Kaltura handles the video, while Canvas connects that video to your course and assignment.
If you need to work with other types of Canvas media, see our guide on how to embed media on Canvas for videos and images.
How Kaltura Works With Canvas
Kaltura works as a video tool inside your Canvas course. Your school’s setup determines how you access it and which options appear.
You may record a new video with Kaltura or upload an existing video file. Kaltura then stores the video and makes it available for use in Canvas. When you submit an assignment, you can select the video through the available Kaltura option.
This setup can make video assignments easier to manage. You don’t always need to upload a large video file directly to Canvas.
Expert Tip: Check your assignment instructions before uploading. Your instructor may require a specific Kaltura submission method.
Kaltura vs. Canvas Video Upload
Kaltura and Canvas serve different purposes. Canvas manages your course, assignments, grades, and submissions. Kaltura focuses on storing and delivering video content.
An instructor may specifically request Kaltura because it provides a dedicated video workflow. It can also give instructors a consistent way to access student video submissions.
If your instructor says “submit through Kaltura,” don’t assume that attaching an MP4 file directly will meet the requirement. Follow the requested submission method instead.
Where Can You Find Kaltura in Canvas?
The location of Kaltura depends on how your college or university configured the Canvas integration. You may find it in several common areas, including:
- The assignment submission area
- The Rich Content Editor
- Your course navigation menu
- A Media or My Media area
- A video or media tool available inside Canvas
The menu name may differ between schools. If you don’t see Kaltura immediately, check your assignment instructions or course navigation.
How to Upload a Video to Kaltura
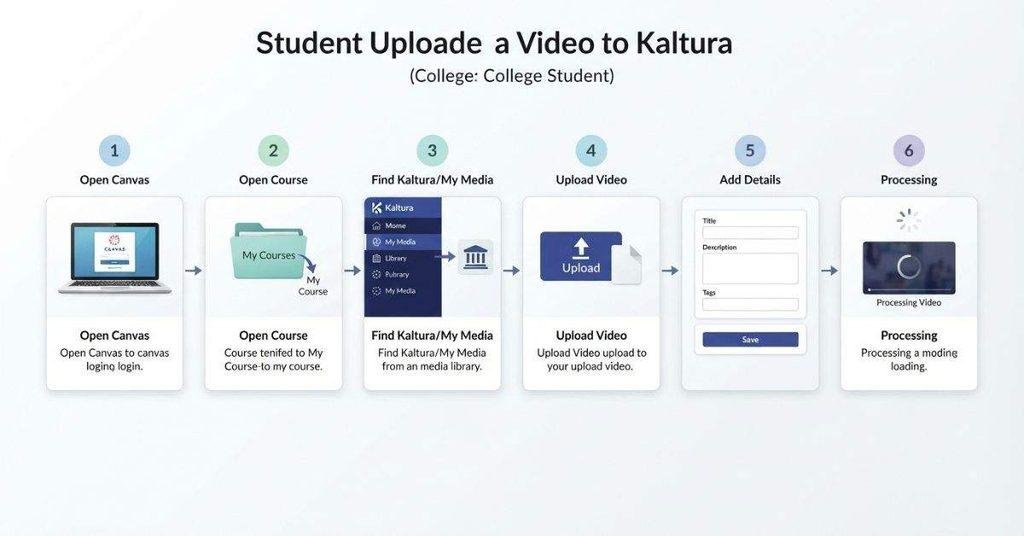
Uploading your video to Kaltura is the first major step. Once uploaded, Kaltura can process the file before you use it in a Canvas assignment.
The exact buttons may differ between colleges. However, the general process follows the same basic workflow.
Step 1 — Log In to Canvas
Start by signing in to your college or university’s Canvas account. Use your school’s official Canvas login page.
After signing in, check that you’re using the correct student account. This helps prevent uploading your video to the wrong course environment.
Step 2 — Open Your Course
From the Canvas dashboard, open the course where you need to submit the video.
Review the assignment instructions before uploading anything. Your instructor may specify a required video format or submission method.
Step 3 — Find Kaltura or My Media
Look through your course for Kaltura, My Media, or another video-related option. Your school may use a different name or location.
You might find Kaltura in the course navigation menu. It may also appear through the assignment submission area or Canvas editor.
If you don’t see it, check your school’s Canvas help resources. Your institution controls how the Kaltura integration appears.
Step 4 — Choose the Upload Option
Open the available Kaltura media area and look for an Upload, Add New, or similar option.
Select the option that lets you upload a video from your device. Avoid choosing a recording option if you already have the finished video file.
Step 5 — Select Your Video File
Choose the video file from your computer, phone, or other device. Kaltura may support several common video formats, but your institution can set specific requirements.
Before uploading, check your assignment instructions for file requirements. Large videos can take longer to upload and process.
Keep these points in mind:
- Confirm the required file format.
- Check any stated file size limits.
- Allow enough time for the upload.
- Use a stable internet connection.
- Keep the browser open until the upload finishes.
Step 6 — Add Video Details
After selecting your file, Kaltura may ask you to provide basic information.
Add a clear title that helps you identify the video later. You can also add a short description if the option appears.
Some Kaltura setups include tags. Add relevant tags when your instructor or school recommends them.
Don’t worry about adding unnecessary information. Focus on details that make your video easy to identify.
Step 7 — Wait for Kaltura to Process the Video
After uploading, Kaltura may need time to process your video. Processing prepares the uploaded file for playback and use within the platform.
This step can take longer than the initial upload. The video may not be immediately available for your Canvas assignment.
Remember these three steps are different:
Uploading ≠ Processing ≠ Assignment Submission
Your video can finish uploading without being ready to use. It can also finish processing without being submitted to your instructor.
Wait until Kaltura shows that processing has finished. Then continue to the Canvas assignment submission step.
If you need to save a course video for later viewing, you can also learn how to download videos from Canvas Instructure when downloading is available.
How to Submit a Kaltura Video to a Canvas Assignment
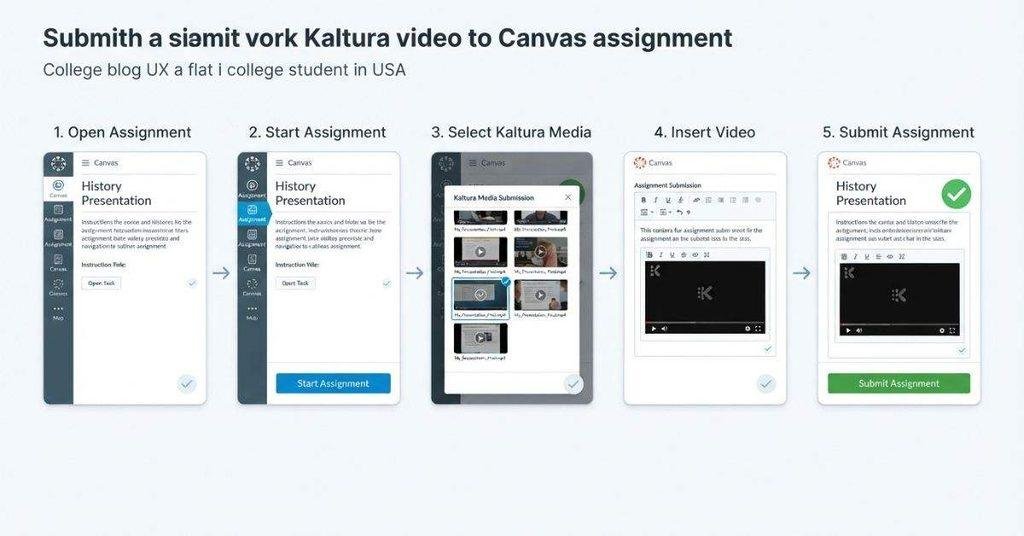
Once your video finishes processing in Kaltura, you still need to submit it through Canvas. This is the most important part of the process.
Canvas may show different buttons or labels depending on your school’s setup. However, the basic submission process usually follows these steps.
Step 1 — Open the Canvas Assignment
Log in to Canvas and open the course containing your video assignment. Find the specific assignment your instructor wants you to complete.
Read the assignment instructions before starting. Check whether your instructor requires a Kaltura video, a specific video, or any additional text.
Step 2 — Click “Start Assignment”
Open the assignment and select Start Assignment. Some Canvas setups may use different wording for this button.
The button might appear as Submit Assignment or another similar option. Look for the control that opens the assignment submission area.
Step 3 — Choose the Available Media/Kaltura Submission Option
Look through the submission options for a Kaltura or media-related choice. You may see options such as Kaltura, My Media, Media, or a media icon.
Your school may place this option inside the assignment editor. It could also appear alongside other submission methods.
If you don’t see Kaltura, review your course instructions or contact your instructor. Don’t upload the video through another method unless your instructor allows it.
Step 4 — Select Your Kaltura Video
Open the available Kaltura media library and find the video you uploaded earlier. Check the title carefully before selecting it.
If you have several videos, choose the correct file for this assignment. Make sure the video has finished processing before selecting it.
Step 5 — Insert or Attach the Video
After selecting your video, Canvas may insert a video player into the submission area. You may see a preview, thumbnail, or media attachment.
Check that the correct video appears before continuing. If Canvas provides a preview, use it to confirm the video and title.
Step 6 — Submit the Assignment
This step is easy to miss.
Selecting a Kaltura video does not necessarily submit the assignment.
After attaching or inserting your video, look for the final Submit Assignment button. Select it when required to send your work to your instructor.
Don’t close the page immediately after selecting your video. Make sure Canvas confirms the actual assignment submission.
Step 7 — Confirm Your Submission
After submitting, check the assignment page for a submission confirmation. Canvas may show the submission status, date, or time.
You may also see your submitted video or a submission details section. If the assignment still shows Not Submitted, complete the submission process again.
Expert Tip: Always verify your Canvas submission before the deadline. A video stored in Kaltura isn’t enough if Canvas hasn’t recorded the assignment submission.
How to Submit a Kaltura Video From the Canvas Rich Content Editor
Some Canvas assignments don’t provide a dedicated Kaltura submission button. Instead, your instructor may ask you to add the video through the Rich Content Editor.
This method still follows the same basic idea. You select your Kaltura video, insert it into the assignment, and then complete the final Canvas submission.
Open the Assignment
Sign in to Canvas and open the course containing your assignment. Select the assignment and review the instructions before making your submission.
Look for an option that lets you start or edit your assignment response. Your Canvas interface may use slightly different wording.
Open the Rich Content Editor
After opening the submission area, locate the Rich Content Editor. This is the text editor where you can enter written responses and add media.
You may see a toolbar with icons for links, images, files, and other content. Look for the option related to media or external tools.
Open the Media/Kaltura Tool
Open the available media tool and look for Kaltura, My Media, or a similar option. The exact name can vary between institutions.
If several media options appear, choose the Kaltura option your instructor expects. This should open your available Kaltura videos.
Select Your Kaltura Video
Find the video you uploaded earlier in your Kaltura library. Check the title carefully before selecting it.
If you have multiple recordings, make sure you choose the correct video for this assignment. Confirm that the video has finished processing.
Insert the Video
After selecting the video, choose the option to Insert, Embed, or add it to the assignment. Canvas should place the video player inside the Rich Content Editor.
Check that the correct video appears before moving forward. If a preview is available, use it to confirm your selection.
Submit the Assignment
Once the video appears correctly, look for the final Submit Assignment button. Select it to send your completed work to your instructor.
Remember, inserting a Kaltura video into the editor doesn’t always complete the submission. You must finish the Canvas submission process when the assignment requires it.
Expert Tip: If you don’t see a Kaltura button, don’t assume the feature is unavailable. Check the Rich Content Editor’s media or external-tool options first.
Before submitting your video assignment, the Canvas Grade Calculator can help you estimate how the assignment score may affect your overall grade.
How to Record a Video Directly With Kaltura in Canvas
Kaltura may also let you record a video directly from Canvas. This option can save time when you don’t already have a video file.
Recording features depend on the Kaltura integration enabled by your college or university. Your screen may therefore look different from another student’s.
Open the Kaltura Recording Tool
Open your Canvas course and access the Kaltura or media tool. Look for an option that lets you create or record new media.
Depending on your school’s setup, this option may appear in My Media, the Rich Content Editor, or an assignment submission area.
Choose the Recording Option
Select the available recording option, such as Record Media or a similar choice. Kaltura may offer different recording methods.
Your available options depend on your institution’s Kaltura configuration. You may be able to record from your webcam, microphone, or screen.
Record Your Video
Set up your camera and microphone before starting. Make sure your microphone captures clear audio.
When you’re ready, start recording and complete your assignment response. Follow your instructor’s requirements for length, content, and presentation.
Review the Recording
Watch your recording before saving it. Check that the video shows correctly and that your audio is clear.
If something went wrong, record the video again when the tool provides that option. It’s better to fix problems before submitting.
Save/Upload the Recording
Save your recording through the available Kaltura option. Kaltura may then upload and process the recording.
Wait for processing to finish before trying to use the video in your assignment. The recording isn’t automatically submitted just because Kaltura saved it.
Submit It to the Canvas Assignment
Return to the assignment and select the Kaltura video through the available submission method. Insert or attach the recording as instructed.
Then complete the final Submit Assignment step in Canvas. Finally, verify that Canvas recorded your submission successfully.
How to Submit a Kaltura Video on the Canvas Student App
Students using mobile devices may want to submit their Kaltura videos through the Canvas Student app. The available features can differ from the browser version.
Open the Canvas Student App
Launch the Canvas Student app on your phone or tablet. Sign in using your school’s Canvas account.
Make sure you’re using the correct account before opening your assignment.
Open Your Course
Find the course where you need to submit your video. Open the course to access its assignments and other materials.
Open the Assignment
Locate the required video assignment and open it. Read the submission instructions carefully before choosing a submission method.
Tap the option that allows you to begin or edit your submission.
Check Available Submission Types
Review the submission options shown in the app. Look for a Kaltura, media, or similar video option.
The app may not display every integration available in Canvas through a web browser. Your school also controls which tools appear.
Select or Upload Your Kaltura Media
If the Kaltura option appears, select it and find your processed video. Choose the correct recording before continuing.
If your institution allows video uploads through the app, follow the available upload instructions. Don’t use a different submission method unless your instructor permits it.
Submit and Verify
After adding your video, complete the final submission step. Don’t assume that selecting the video automatically submits your assignment.
Check the assignment status afterward. If the Kaltura option isn’t available in the app, open Canvas in a browser instead. The browser version may provide additional Kaltura and submission options.
Why Can’t I Find My Kaltura Video in Canvas?
Can’t find your Kaltura video when you’re ready to submit? Several common issues can cause this problem. Most are easy to check and fix.
The Video Is Still Processing
Your video may have uploaded successfully but still be processing. Kaltura may not make it available for Canvas use until processing finishes.
Next step: Open your Kaltura media area and check the video’s status. Wait until processing finishes, then refresh Canvas and try again.
You Uploaded It to the Wrong Kaltura Area
Some schools provide multiple media areas or Kaltura tools. Your video may be stored somewhere that your assignment cannot access.
Next step: Return to the Kaltura or My Media area connected to your Canvas course. Check whether your video appears there.
You’re Using the Wrong Canvas Course
It’s easy to open a different course when you have several classes in Canvas. Your video may be associated with another course or assignment.
Next step: Check the course name and assignment details. Make sure you’re working inside the correct class before selecting your video.
The Video Has Not Finished Uploading
A slow connection can interrupt or delay an upload. Closing the page too early can also prevent the upload from completing.
Next step: Return to Kaltura and check whether the video appears completely uploaded. If needed, upload it again using a stable internet connection.
The Assignment Does Not Allow Kaltura Submissions
Not every Canvas assignment accepts Kaltura media. Your instructor may have enabled only specific submission types.
Next step: Review the assignment instructions and available submission options. If Kaltura isn’t listed, ask your instructor which submission method you should use.
Kaltura Is Not Enabled for Your Course
Your college may offer Kaltura across Canvas but disable it for certain courses. This can explain why you don’t see any Kaltura options.
Next step: Check your course navigation and assignment editor. If Kaltura is missing everywhere, contact your instructor or school Canvas support.
You’re Using the Wrong Account
Your Kaltura media may belong to a different account than the one connected to your Canvas profile.
Next step: Sign out and confirm you’re using your school’s official Canvas account. Then reopen the Kaltura tool and check your media library.
Why Won’t Canvas Let Me Submit My Kaltura Video?
Finding your Kaltura video and submitting it are two different problems. Your video may appear correctly but still fail during submission.
The cause can involve assignment settings, deadlines, processing, browser issues, or your instructor’s requirements. Try these practical fixes before uploading the video again.
The Assignment Submission Type Is Different
Your instructor may have enabled a submission type that doesn’t accept Kaltura media. Canvas can restrict which options students can use.
Next step: Check the assignment instructions and available submission methods. Use the required method instead of trying to force a Kaltura submission.
The Assignment Deadline Has Passed
Canvas may prevent submissions after the assignment deadline. Some instructors allow late submissions, while others don’t.
Next step: Check the assignment’s due date and availability dates. If the deadline passed, contact your instructor about whether late submission is allowed.
The File/Video Is Still Processing
A Kaltura video may appear in your media library before processing finishes. Canvas may not allow you to submit it until Kaltura makes the video available.
Next step: Open Kaltura and check the video’s processing status. Wait until processing finishes, then return to Canvas and try again.
The Kaltura Integration Is Not Loading
Sometimes the Kaltura tool may fail to load inside Canvas. You might see a blank window, loading screen, or missing media options.
Next step: Refresh the Canvas page and reopen the assignment. If the problem continues, try accessing the assignment through a browser instead of the Canvas Student app.
Your Browser Has a Problem
Browser extensions, outdated software, or temporary browser data can interfere with Canvas tools.
Next step: Refresh the page or try another supported browser. You can also try a private browsing window to check whether the issue continues.
Your Instructor Requires a Specific Submission Method
Your instructor may require you to use a particular Kaltura workflow. For example, they might want the video inserted through the Rich Content Editor instead of another submission option.
Next step: Follow the exact instructions provided with the assignment. If the instructions aren’t clear, ask your instructor which Kaltura submission method they expect.
Kaltura Video Uploaded but Not Submitted to Canvas
Uploading a video to Kaltura does not automatically submit it to your Canvas assignment. Students often complete the first step and assume the assignment is finished.
The complete process usually looks like this:
Uploaded to Kaltura
↓
Video processed
↓
Video selected in assignment
↓
Assignment submitted
↓
Submission confirmed
Check each stage before assuming your work is complete.
First, open Kaltura and confirm that your video appears in your media library. Then check its status to make sure processing has finished.
Next, open the correct Canvas assignment and confirm that you selected the intended Kaltura video. Look for the video player, thumbnail, or media attachment in your submission.
Finally, select Submit Assignment when Canvas requires it. Don’t leave the page after inserting the video without checking whether Canvas recorded the submission.
How to Check if Your Kaltura Video Was Successfully Submitted
Checking your submission takes only a moment but can prevent deadline problems. Canvas usually provides several clues that your assignment went through successfully.
Look for the Submission Confirmation
After submitting, Canvas may display a confirmation message or change the assignment status. This indicates that Canvas recorded your submission.
If you don’t see any confirmation, return to the assignment and check its current status.
Check the Assignment Submission Details
Open the assignment again and look for your submission details. You may see your submitted media, submission status, or other assignment information.
If your video isn’t shown, don’t assume the submission worked. Check the assignment instructions and try the submission process again if allowed.
Check the Submission Date and Time
Look for the recorded submission date and time. This can help confirm that Canvas received your assignment.
This is especially important when you’re submitting close to the deadline. Save or note the confirmation details if your course provides them.
Make Sure the Correct Video Was Submitted
Don’t only check whether a video appears. Confirm that it’s the video your instructor requested.
Check the video title and, when available, its preview or thumbnail. This helps prevent accidentally submitting an older recording.
Check Whether the Video Plays
Open the submitted video and make sure it loads correctly. A visible video player doesn’t always mean the media will play properly.
If the video won’t play, check whether Kaltura finished processing it. Then contact your instructor or school support if the problem continues.
What to Do if Your Kaltura Video Won’t Upload
A failed Kaltura upload can happen for several reasons. Before contacting support, try these simple troubleshooting steps.
Check Your Internet Connection
A weak or unstable connection can interrupt a video upload. Large video files may also take time to transfer completely.
Try switching to a more stable connection if possible. Then restart the upload and keep the connection active until it finishes.
Check the Video File
Make sure you selected the correct video file from your device. Check that the file opens and plays normally before uploading it.
Your school or Kaltura setup may have specific file requirements. Follow the requirements listed in your assignment instructions or school documentation.
Try a Different Browser
A browser issue can sometimes prevent Kaltura from loading or uploading correctly. Refreshing the page may also resolve temporary problems.
If the upload still fails, try another supported browser. Sign in again and restart the upload process.
Keep the Kaltura Upload Page Open
Don’t close the browser or leave the upload page while your video is transferring. Doing so can interrupt the upload.
Wait until Kaltura indicates that the upload has finished. Then allow additional time for processing.
Wait for Video Processing
Uploading and processing are separate stages. Your video may finish uploading while Kaltura continues preparing it for playback.
Check the video’s status in your Kaltura media area. Wait until processing finishes before trying to add the video to Canvas.
Contact Your Instructor or School’s Canvas Support
If these steps don’t work, contact your instructor or your school’s Canvas support team. Explain what happens when you try to upload the video.
Include useful details such as the error message, the assignment name, and when the problem occurred. Avoid repeatedly uploading the same file if Kaltura keeps failing.
Kaltura Video Submission vs. Regular Canvas Video Upload
Canvas can offer several ways to submit or add video. The best option depends on your course requirements and the tools enabled by your institution.
| Method | Best For |
|---|---|
| Kaltura | Courses requiring Kaltura media |
| Canvas media upload | Assignments allowing direct Canvas uploads |
| External video embed | Videos hosted on supported platforms |
| Rich Content Editor | Adding media inside supported Canvas content |
Kaltura works well when your instructor specifically requires Kaltura for video assignments. It keeps the video within the institution’s configured media workflow.
A Canvas media upload may work when the assignment accepts direct video submissions. However, don’t switch to this method simply because it seems easier.
An external video embed can work when your instructor allows videos hosted on supported platforms. The Rich Content Editor can also provide a way to add media directly inside your response.
The key rule is simple: use the submission method your instructor specifies. Your school’s Canvas and Kaltura setup may differ from another institution’s setup.
Conclusion
Submitting a Kaltura video through Canvas is easier once you understand each step. You learned how to upload, process, select, submit, and verify your video.
Knowing how to post Kaltura video for Canvas assignment can help you avoid missed submissions and last-minute confusion. Always check that your video finished processing before submitting it.
Remember that uploading a video to Kaltura doesn’t automatically submit your assignment. You must select the correct video and complete Canvas’s final submission step.
Before the deadline, confirm your submission status, date, time, and video playback. If something goes wrong, contact your instructor or school’s Canvas support team.
Have you encountered a Kaltura submission problem? Share your experience or explore more helpful Canvas guides on our website.
Frequently Asked Questions
How do I submit a Kaltura video to a Canvas assignment?
Open your Canvas assignment and select Start Assignment. Choose the available Kaltura or media option, then select your processed video. Insert it into the submission and click Submit Assignment. Finally, check the assignment status to confirm Canvas recorded your submission.
How do I upload a video to Kaltura in Canvas?
Open your Canvas course and find Kaltura, My Media, or the available media tool. Choose the upload option and select your video file. Add details such as the title and description when available. Wait for Kaltura to finish processing before using the video in an assignment.
How do I post a Kaltura video for a Canvas assignment?
First, upload your video to Kaltura and wait for processing to finish. Then open the correct Canvas assignment and select the Kaltura media option. Choose your video, insert it into the submission, and complete the final Canvas submission. Always verify the submission afterward.
Why can’t I find my Kaltura video in Canvas?
Your video may still be processing or stored in a different Kaltura area. You could also be using the wrong Canvas course or account. Check your Kaltura media library and confirm the video finished processing. Then reopen the correct Canvas assignment and try again.
Why is my Kaltura video still processing?
Kaltura needs to process uploaded videos before they become fully available for playback. Processing can take some time depending on the video and system conditions. Keep the page open and check the video’s status later. Don’t repeatedly upload the same video while processing continues.
How do I record a Kaltura video in Canvas?
Open the Kaltura or media tool available in your Canvas course. Choose the recording option and follow the prompts to record your video. Review the recording before saving it. Then wait for Kaltura to process it before adding the video to your assignment.
Can I submit a Kaltura video from the Canvas Student app?
You may be able to submit Kaltura media through the Canvas Student app. Available options depend on your school’s Canvas and Kaltura integration. If Kaltura doesn’t appear in the app, open Canvas through a web browser. The browser version may provide additional submission options.
Does uploading a video to Kaltura submit my Canvas assignment?
No. Uploading a video to Kaltura does not necessarily submit your Canvas assignment. You usually need to select the video inside the assignment and complete the final Submit Assignment step. Always check the assignment status afterward.
How do I know if my Kaltura video was submitted?
Open the Canvas assignment after submitting your video. Look for a submission confirmation, submission details, and a recorded date and time. Check that the correct video appears and plays properly. If Canvas still shows the assignment as unsubmitted, investigate before the deadline.
What should I do if Canvas won’t accept my Kaltura video?
First, check whether the video finished processing and whether the assignment accepts Kaltura submissions. Then refresh Canvas or try another browser. Check the assignment deadline and required submission method. If the problem continues, contact your instructor or school’s Canvas support team.

We are the Canvas Academic Team, a developer team focused on building simple and practical tools that help students succeed academically. This platform was created specifically for Canvas LMS students to make grade tracking, GPA calculations, exam planning, and academic management easier and more efficient.
Our focus is on creating fast, accurate, and student-friendly educational tools along with helpful learning resources that improve productivity and reduce academic stress.
Through CanvasGradeCalculator.com, our goal is to continue building useful resources that help students study smarter, stay organized, and achieve better academic results.